(This is my first attempt at a tutorial quite like this, so please let me know if anything is confusing!)
All you need is a pair of men's pajama pants, and 30-60 minutes, depending on the frequency and length of your distractions.
A little bit of back story...
Back in December, I picked up a pair of pajama pants for Richard. Yes, I could have made him some myself. I'd messed about with the idea. But I was feeling swamped with other projects, I always end up totally frozen by incompetence when I try to sew something for myself or my husband, and Old Navy was running them at such a low price that I couldn't even buy fabric for that little. So I opted to save myself some stress, time and money and just buy them. My mistake came when a bout of indecisiveness hit at the store. I had the perfect pair of pajama pants in my hand, decided against them and hung them back up, then changed my mind again and picked them back up. Only problem being that, while I had closely checked the size the first time that I picked them up, I didn't when I went back for them. The size tag on the hanger read medium, but the pants were actually XXL. WAY too big. And we put off returning them until I'd lost the receipt, so they've just kind of been hanging around waiting for me to either chop them up or donate them to Goodwill. Bug decided that he really liked the idea of having matching pajamas with Daddy, so I decided to chop them up.
Here's how:
First, wrangle your small children out of the pants...
 |
| I love the look of adoration she has for him here. We see that face a lot. |
Lay out the pants and determine how much length you need for your little person. Use a pattern that you love to determine how long they need to be. Keep in mind that you're not going to have to hem the pants because you'll be using the existing hem. Remove the pants legs with enough length to cut out your new pattern. (Since I'll still be using the top of the pants to make a pair of shorts for Richard, I also made sure that I had enough length left to do that.)
Cut the pants legs open along the INSIDE seam so that you can lay the fabric out flat. I would recommend giving them a good pressing here, just to make sure that nothing goes wonky in the next few steps. I'm a big fan of excessive pressing.
Once the fabric is open and flat, lay the cut open pants legs with RIGHT sides together. If there was an outer leg seam on the original pair of pants, make sure that you match it up. I suggest pinning along the seam, if there is one, and making sure that the bottom hems are even.
Lay your pattern piece on top of the flattened pajama fabric, putting the outer seam where it would fall on the finished pair of pants. I used a pattern of my own making that doesn't usually finish with an outer seam, so made sure that the existing outer seam fell in the center of the pattern piece, along the grain line.
Pin and cut out your pattern.
I suggest marking front and back at this point, just to keep things from getting confusing later. I always put a safety pin on the outside near the center back seam, but do whatever works for you.
At this point there was mayhem with my little people, so I had to walk away for a moment. Which necessitates "Remove cat from your fabric" as the next step in my house.
 |
| Chin says these are super cozy pants! |
Because the fabric on this particular pair of pants is somewhat thin and I worried a little about it falling apart at the hands of my active boy, I opted to put in french seams. If you trust your fabric, serging would work just as well.
Once both legs are sewn up (and you've pressed that seam open), you'll need to attach them. Turn one leg inside out and the other right side out. Because I was doing a french seam, I set them inside one another RIGHT sides together, and then flipped them to WRONG sides together and stitched again.
Now turn the pants inside out and mark your waistband. Again, because of the lightweight fabric, I wanted to make sure that the stitching wasn't going to pull out, so I marked a fold like 1/2 inch from the top edge, and another 1 inch below that. Press and pin.
Then stitch your waistband, leaving an opening at center back for elastic. I like to stitch just at the top edge of the waistband, too, to keep it from rolling around while Bug is wearing them.
Insert your elastic. Make sure to test the waistband size on your little one, if necessary, and then stitch the ends of your elastic together.
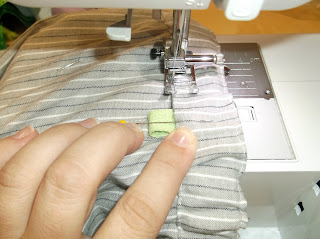
Close the casing and you're all done! (I added a little twill tape tab, so that Bug could tell front from back. he admonished me for not adding a frog loves monkey label - ha!)
Try the pants on your little person and then just TRY to get them to take them off!


No comments:
Post a Comment