A conversation with Bug:
Bug: "I don't like fingernails."
Me: "You don't like fingernails?"
Bug: "Nope. They're not good."
Me: *pause* "You mean to eat?"
Bug: "Yeah."
Wednesday, December 29, 2010
Sunday, December 26, 2010
Easy-Peasy Truffles
I hope everyone had a really nice time celebrating their winter holiday of choice. :)
We had a really great time and I'm looking forward to sharing some pictures a little later. Right now I'm just too wiped out to resize photos, so I'll talk about food instead. No pictures because it was all DEVOURED, but I made some yummy truffles to contribute to the holiday food selection. It's becoming a bit of a tradition. :)
I know that this recipe came from somewhere, but it's been a few years and I couldn't say where. Apologies. I'd like to offer credit where it's due.
These truffles are SO STINKIN' GOOD...and remarkably simple. You need baking chocolate - in a form that will melt - and cream cheese. Whatever amount of cream cheese you want to use, have double the amount of chocolate. Or equal parts of two different chocolates.
Melt 1/2 of your chocolate. I do this on the stove so that I can watch it, but I suppose you could do it in the microwave and just keep an eye on it. You don't want it to burn.
Once the chocolate is melted, mix in your cream cheese. (I tried this over low heat this time because I was using a block of cream cheese and it worked out okay. Just watch your heat.)
Once the cream cheese and melted chocolate are mixed together, put it in the fridge to cool. About two hours.
When the chocolate and cream cheese mixture have set up a bit, remove from the fridge and melt the last half of your chocolate. Form balls of the chocolate and cream cheese mixture and dip in the melted chocolate. Set aside for coating to harden and then enjoy.
I tried something different this year and used almond bark for the truffle innards and Wilton meltaways for the coating. They turned out nicely when the finished product was stuck in the freezer, but I wouldn't recommend it for truffles you'd like to leave out for the grabbing. The almond bark had a lot more oil/fat in it and never really solidifed the way I'm used to. Luckily, the meltaways hardened and held the truffles together. Next time, I'll just spring for the good chocolate to begin with. (In the past I've used both Hershey and Ghirardelli. Both work beautifully.)
Tuesday, December 21, 2010
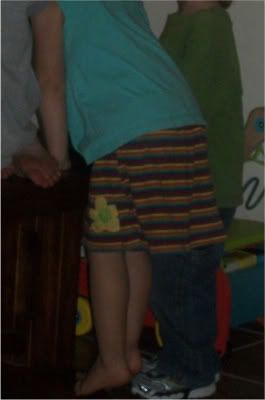
Skirt in Action
So it turns out that my niece likes the skirt I made for her birthday. (Yay!)
She was wearing it when we went over the other day and I tried to get a picture...but three year olds rarely stand still...
She was wearing it when we went over the other day and I tried to get a picture...but three year olds rarely stand still...

Felt Eggs and a Sort-Of Tutorial
I've been in love with play food for awhile. We started collecting it when Bug was about eight months old. (We got an awesome crocheted set of fruit and veggies from my friend Crystal at Loin Cloth. I highly recommend asking her for a set.) When Bug got his play kitchen for Christmas last year, we added a fairly good selection of wooden food. We've never managed any felt food, though I've been eyeballing it for awhile. It's just so cool looking!
After having read a million and four tutorials on making felt (not felted...still out of my league) play food, I decided to take the plunge and try to whip some up in time for Christmas. I'll split what I make between Bug and his best friend back in Texas, who's been really into his kitchen and store set-up.
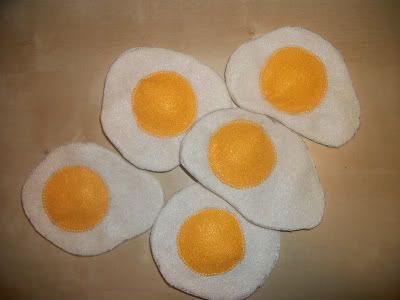
Here's my take on eggs. And I aplogize if I'm essentially repeating someone else's tutorial. I've read a lot of them and absorbed a lot of tips from different places but ended up winging it. Not trying to steal from anyone. :)
I started with two sheets of off-white and one of yellow-orange poly felt. I would have preferred wool, but it was outside of my budget.
On one sheet of off-white felt, I drew egg-y shapes. I managed five, though with better planning I think I could have gotten six to fit. Sorry, no photo of that step.
I found a round lid that was a good size for the egg-y shapes, and cut circles out of the yellow felt. Pinned them in place on top of the single sheet of off-white.
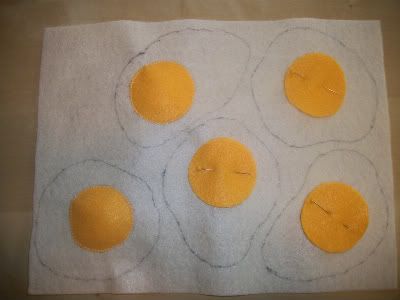
Because I thought it would look nice, I used a zig-zag to stitch the yolks in place.
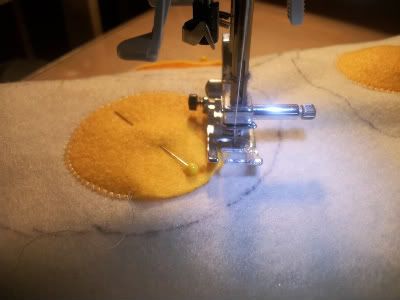
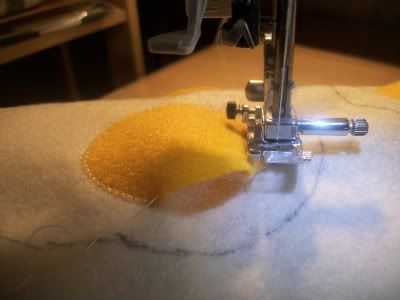
When the yolk pieces were almost sewn into place, I paused and stuffed just a tiny bit of stuffing beneath. I was thrilled to discover bamboo fill but, again, the poly stuff was in my price range. Wool roving or small fabric scraps would also work. Or you could just leave them flat. That looked nice too, but I wanted them a little puffy.
Once all the yolks were sewn into place, I pinned the second off-white sheet of felt to the back (to add a bit of thickness and make them a tiny bit more stiff) and stitched just inside the lines I'd drawn. When all of the eggs had been sewn together, I cut between the stitching and the drawn lines and...voila! Eggs!
After having read a million and four tutorials on making felt (not felted...still out of my league) play food, I decided to take the plunge and try to whip some up in time for Christmas. I'll split what I make between Bug and his best friend back in Texas, who's been really into his kitchen and store set-up.
Here's my take on eggs. And I aplogize if I'm essentially repeating someone else's tutorial. I've read a lot of them and absorbed a lot of tips from different places but ended up winging it. Not trying to steal from anyone. :)
I started with two sheets of off-white and one of yellow-orange poly felt. I would have preferred wool, but it was outside of my budget.
On one sheet of off-white felt, I drew egg-y shapes. I managed five, though with better planning I think I could have gotten six to fit. Sorry, no photo of that step.
I found a round lid that was a good size for the egg-y shapes, and cut circles out of the yellow felt. Pinned them in place on top of the single sheet of off-white.

Because I thought it would look nice, I used a zig-zag to stitch the yolks in place.

When the yolk pieces were almost sewn into place, I paused and stuffed just a tiny bit of stuffing beneath. I was thrilled to discover bamboo fill but, again, the poly stuff was in my price range. Wool roving or small fabric scraps would also work. Or you could just leave them flat. That looked nice too, but I wanted them a little puffy.

Once all the yolks were sewn into place, I pinned the second off-white sheet of felt to the back (to add a bit of thickness and make them a tiny bit more stiff) and stitched just inside the lines I'd drawn. When all of the eggs had been sewn together, I cut between the stitching and the drawn lines and...voila! Eggs!

Mud Day
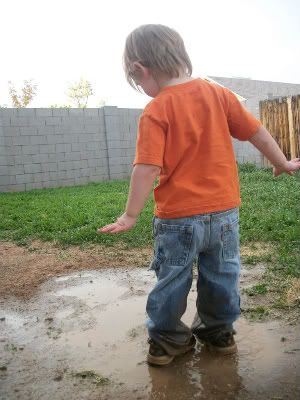
Bug was playing with a bucket of water at the new house a few days ago. Lots of splashy fun and I was kind of surprised by how relatively clean he managed to stay.
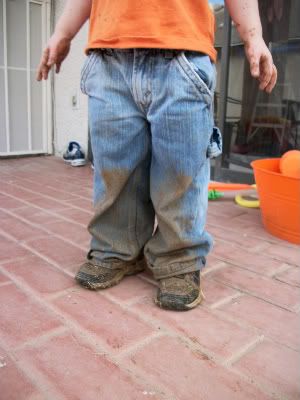
And then there was the clean up. In which the bucket of water was dumped out. And we had MUD!
He had a blast!
Check out those shoes. They were the only pair he had that day...
And then there was the clean up. In which the bucket of water was dumped out. And we had MUD!
He had a blast!

Check out those shoes. They were the only pair he had that day...

Finished: Set of Pajama Pants
I actually should have posted this one a few days ago.
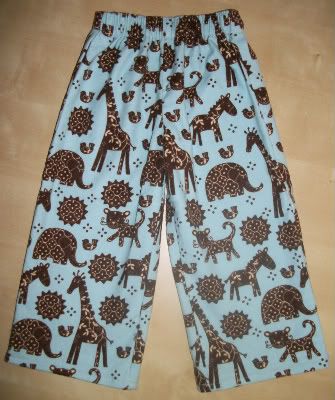
A friend of mine contacted me awhile back and asked about getting some pajama pants made for her family for Christmas. Three matching sets - for herself, her husband and their two year old son. We talked about it a little bit, it got put on the back burner for awhile, then was revived and turned into a real project.
She picked the most awesome fabric and Joanne's had it for next to nothing...until I went to the store the following morning and discovered that the sale had ended the previous evening. The fabric was going to cost four times as much as we'd expected. It took a week to hunt down the fabric in the proper amount for three pair of pants and, after talking to the store manager, another two or three days before we were able to get it at a reasonable price. (Lesson learned? It doesn't hurt to ask!)
I only managed a decent(ish) picture of little E's pants - and even that one was taken at around midnight so the lighting is terrible. I loved how the pants turned out though (and I LOVE her fabric choice!). She received them quickly and seemed very, very happy with them. (Yay!) I can't wait to hear how they work out.

Sunday, December 19, 2010
Ohmigosh...winnings!
You read that right...winnings! With an s!
Sew, Mama, Sew had a Giveaway Day on December 13th. I first learned of Giveaway Day last time, during May. There were so many neat giveaways but, even better, it was a great way to learn about some great new blogs. I wanted to take part this time but there's been more than just a little bit going on here lately. So I perused the lists and looked at blogs and entered a few giveaways. And won! Two!
The first was put on by ex libris handmade, for a custom bunting. I'm really excited about it. I think that it'll be awesome to hang up in the playroom at the new house.
The second was put on by Affectioknit, for a beautiful handmade felt ornament. I love these and was so excited to see my name listed among the winners!
I'm looking forward to May's Giveaway day, when I can give back to someone else.:)
Monday, December 13, 2010
A Gift for Grandma
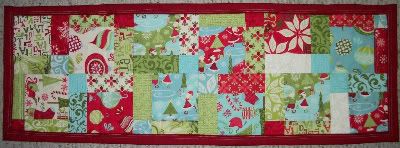
So that charm pack that I received with my mug rug? It's already been chopped up and rearranged and sent to Texas as a Christmas gift for my grandmother. Initially, I thought that a set of placemats and coasters would be a great idea...but I was limited to the charm pack and some Kona red. I considered a couple of hot pads and coasters, but that seemed...small? So I decided on the table runner.
I tried a disappearing nine-patch for the table runner - three sets with the blocks rearranged more or less at random. There was a pattern, but I certainly couldn't explain it verbally.
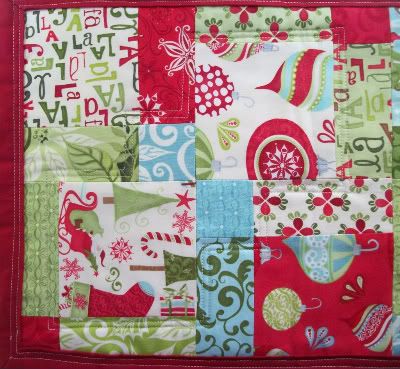
Close-up of part of the front. Pretty prints. :)
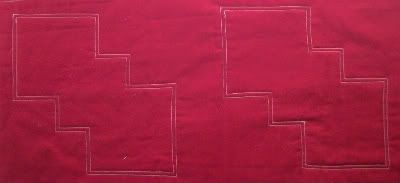
I quilted around specific blocks, which is easier to see from the back.
Twelve squares were turned into a set of coasters.
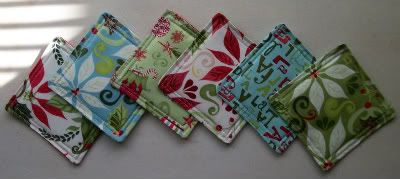
I LOVE the way this turned out and have been eyeballing charm squares to make another...
I tried a disappearing nine-patch for the table runner - three sets with the blocks rearranged more or less at random. There was a pattern, but I certainly couldn't explain it verbally.

Close-up of part of the front. Pretty prints. :)

I quilted around specific blocks, which is easier to see from the back.

Twelve squares were turned into a set of coasters.

I LOVE the way this turned out and have been eyeballing charm squares to make another...
Mug Rug Received
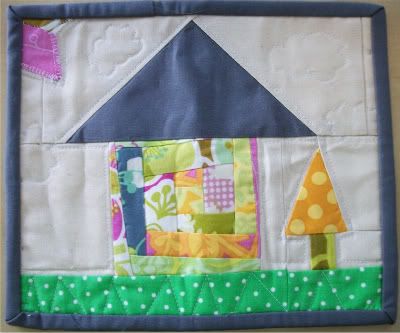
A few days ago, I received an awesome little package from Hope (GoingSewCrazy) from the scrappy mug rug swap. It was amazing! The mug rug is super duper cute, and she included some amazing goodies.

The mug is super cute - Richard said we need to find three more to make a set - and the fabric! Bug was so excited to see it in the box that he snatched it out of my hand and kept asking "Is it fabic? Is it mine? Can I have it?" He ripped the wrapper off before I could get a picture of the charm pack all together. It's Moda's "12 Days of Christmas". I don't usually go for holiday themed fabric, but these were awesome all together.
Here's a picture of just the mug rug. Check out the cute cloud quilting. :)
(And now I can say that my little robot mug rug went to Kendra. You might recognize the name from a June bee block post. I thought it was super cool that, from a pool of something like 120 people, I was paired with someone that I "know".)

The mug is super cute - Richard said we need to find three more to make a set - and the fabric! Bug was so excited to see it in the box that he snatched it out of my hand and kept asking "Is it fabic? Is it mine? Can I have it?" He ripped the wrapper off before I could get a picture of the charm pack all together. It's Moda's "12 Days of Christmas". I don't usually go for holiday themed fabric, but these were awesome all together.
Here's a picture of just the mug rug. Check out the cute cloud quilting. :)

(And now I can say that my little robot mug rug went to Kendra. You might recognize the name from a June bee block post. I thought it was super cool that, from a pool of something like 120 people, I was paired with someone that I "know".)
Sunday, December 12, 2010
Bug's Obession

This is what we see from the kitchen at my mom's house. A gorgeous orange tree that Bug has been eyeballing for almost six months. Now that the oranges are actually *orange*, he's been chomping at the bit to eat one. Daily, he'll exclaim "They're ripe!" We tested one a week or so ago and it was still pretty bitter. This week, they're MUCH better. And he's been eating as many as we'll allow him to have. :)
Friday, December 10, 2010
A Birthday Skirt
I have so much to blog about that it's not even funny... But I'll tackle it one post at a time, yes? :)
Nearly two weeks ago now, my niece turned three. She is a sweet, amazing, smart, beautiful little girl and I wanted to give her a really amazing gift. Lucky for me, even though she's discovered Disney's Princesses, she also tends to be a fan of NON-Disney stuff. She also loves purple. A lot.
I went around and around trying to decide what to do, and kept coming back to a t-shirt that I'd set aside to "do something cool with"...but I still wasn't sure what I wanted to do. At not-quite-the-eleventh hour, I decided to make her a skirt. It was remarkably simple and went together super fast.
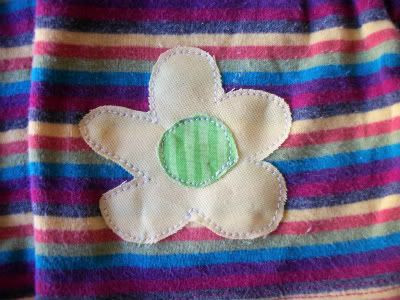
It was cute...but lacking something. So I appliqued a little flower on the hem. I free-handed the flower (which was scary as crap to do on a finished garment), and was really happy with how it turned out.
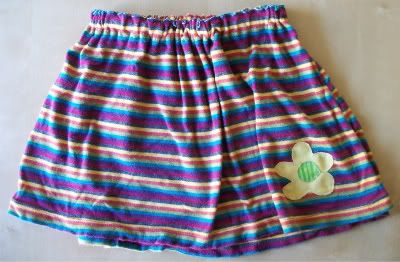
The applique is finished, but rough on the edges so it'll fray a bit in the was and with wear.
I haven't heard yet if she liked it or not. (But I enjoyed it so I'll probably be making some more anyway. ;) )
Nearly two weeks ago now, my niece turned three. She is a sweet, amazing, smart, beautiful little girl and I wanted to give her a really amazing gift. Lucky for me, even though she's discovered Disney's Princesses, she also tends to be a fan of NON-Disney stuff. She also loves purple. A lot.
I went around and around trying to decide what to do, and kept coming back to a t-shirt that I'd set aside to "do something cool with"...but I still wasn't sure what I wanted to do. At not-quite-the-eleventh hour, I decided to make her a skirt. It was remarkably simple and went together super fast.
It was cute...but lacking something. So I appliqued a little flower on the hem. I free-handed the flower (which was scary as crap to do on a finished garment), and was really happy with how it turned out.

The applique is finished, but rough on the edges so it'll fray a bit in the was and with wear.

I haven't heard yet if she liked it or not. (But I enjoyed it so I'll probably be making some more anyway. ;) )
Subscribe to:
Posts (Atom)


